Tips for Creating an Outdoor Room

Tips for Creating an Outdoor Room

An inviting outdoor room greatly increases the appeal and value of your home and provides a comfortable, happy space for friends and family, allowing you to maximize the time you spend outdoors. Here are a few suggestions to keep in mind while creating the perfect space for you.

Determine the Available Space

Determine the amount of space you want to transform, and gather ideas on how to use this space, taking into account the purpose you want it to serve: cooking, dining, relaxation and play.

Identify Spaces and Products Dedicated to Specific Areas

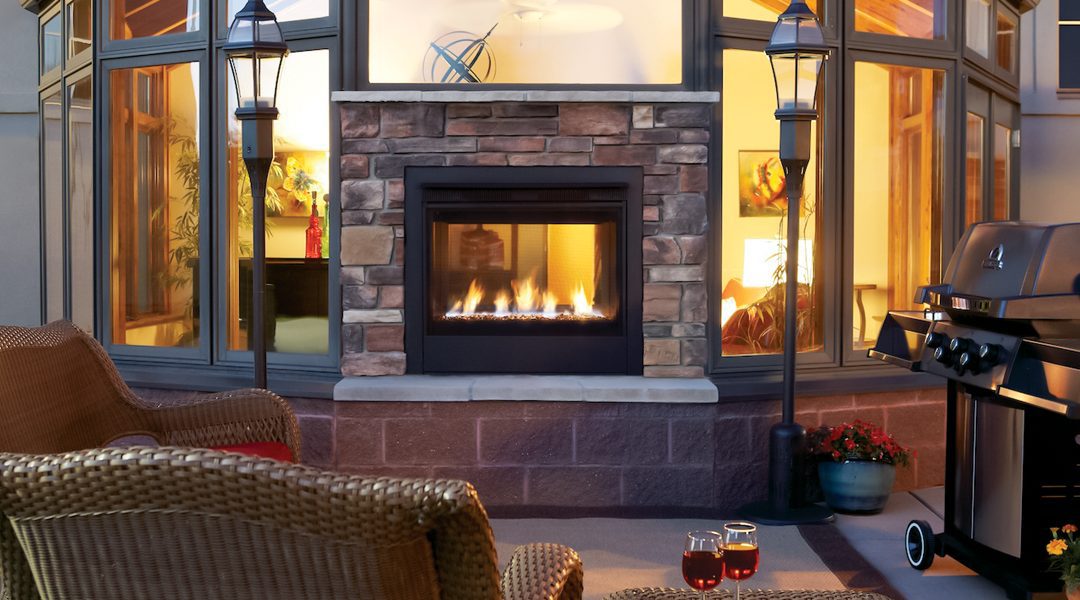
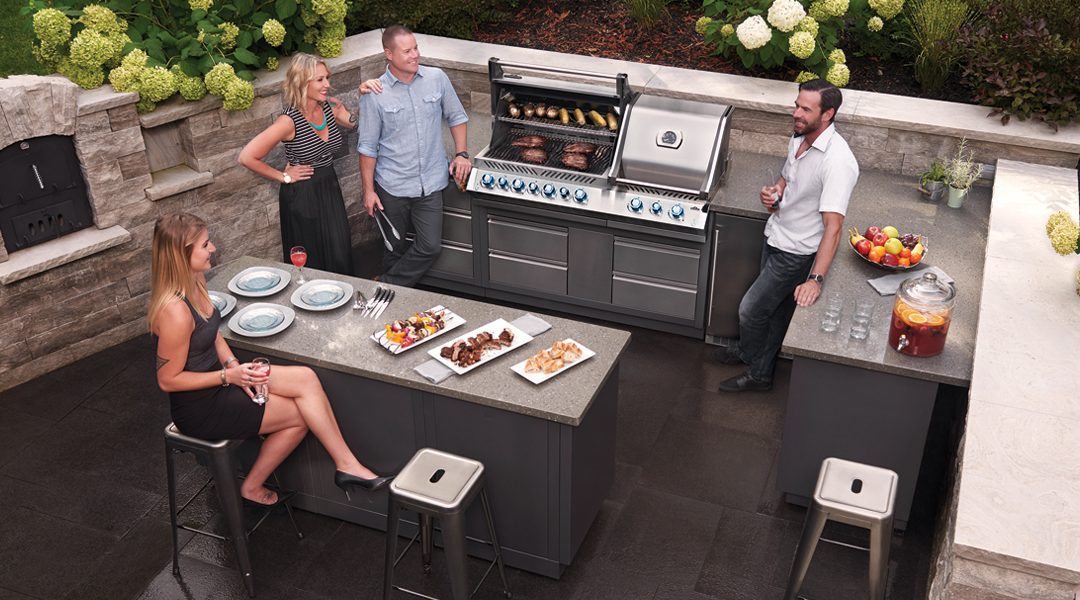
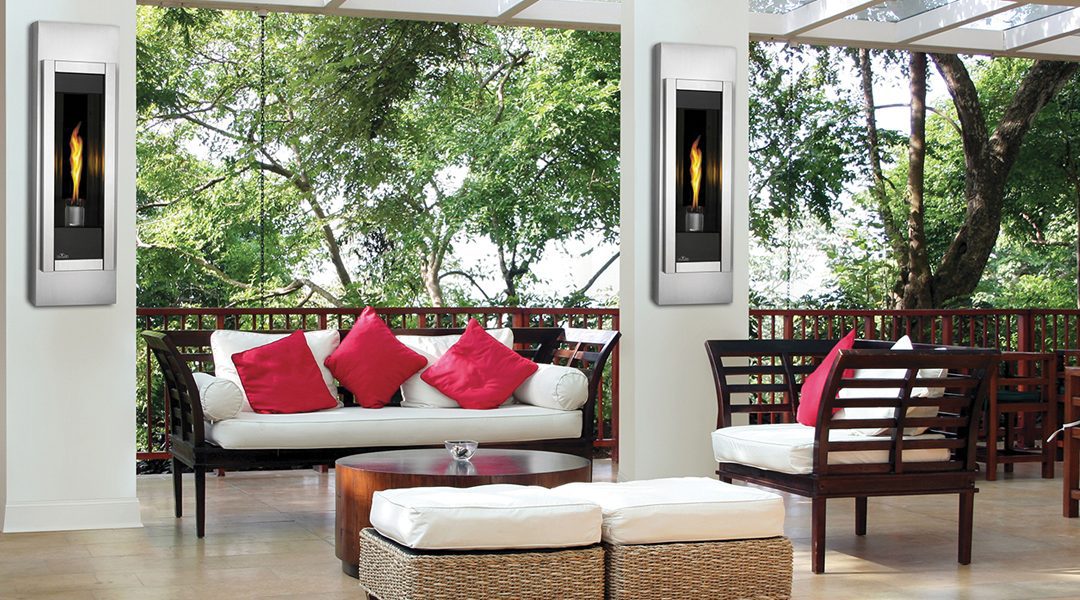
These elements are crucial to establishing a plan according to your needs and desires. Position an outdoor fireplace as the focal point, determine the cooking and eating spaces, and define any other area you want to include.

Create Your Wish List

Magazines, newspapers and websites are all excellent reference tools that can guide you in your quest for the perfect outdoor room. Collect, print and file your favorite photos and articles so you can refer to them as you develop your outdoor room.

Consider the Style of Your Home

It is important to understand the architectural style of your home in order to create an outdoor room that reflects the interior. There are products, furniture and objects for all tastes and styles.

Think About Foundations

A stone terrace, retaining walls, a fence and a terrace are basic elements to consider.

Use Landscaping as an Accessory

Well positioned flowers, plants and shrubs will add the finishing touch, completing your design. Select plants that change with the seasons, offering different colors, different blooms and heady smells depending on the time of year. Be sure to read our article on working with a Professional Landscaper beginning on page 4 for more information.

Draw Up a Plan

The best way to design an outdoor room that will reflect your desires is to make sketches. Don’t worry about your drawing skills; the important thing is that the general idea is well represented.

Visit a Specialty Shop

A specialized retailer is a key partner in creating your outdoor room. Bring your ideas to a retailer who sells fireplaces, barbecues and/or patio furniture. They can help you determine the products, materials and accessories available in your area and guide you in the realization of your plan, in addition to coordinating the installation. A turnkey service will save you from surprises.

Research Products You’re Interested In

After checking details with a specialized retailer, go online to review products and manufacturer information.

Add Furniture

Choose comfortable furniture that will make people want to linger. No matter the style, patio sets are designed to create atmosphere, and give beauty and character to the oasis that will reflect your personality. In addition to tables and chairs for the dining area, consider a lounge area with sofas, loveseats and side tables.

Don’t Forget The Lighting

Maximize the time you spend outdoors by lighting important areas such as sidewalks, dining and leisure areas, or around the pool. Strategically place lights to highlight your landscaping.

Details, Details, Details

Once everything is done and done right, you can add small details that will make your outdoor room stand out. Pots of flowers, rugs, a special table or a piece of art can all enhance the ambiance of your patio!

Complete Your Project One Step at a Time

It often takes a few years to achieve the perfect end result while staying on budget despite a long wish list. Start by installing an outdoor fireplace and plan a dining area. Over the years, add accessories, decorative elements and landscaping.

Build Your Space

Have fun building this space! Remember to include all the things that are important to you, such as cooking, dining, relaxation and play areas.

Professional Landscaping: Designing Your Outdoor Living Space

Professional Landscaping: Designing Your Outdoor Living Space

It’s finally time to prepare your outdoor living space! Planning remains the key to avoiding costly mistakes and ensuring all your outdoor space wishes are realized. A professional landscaper is an important part of the design process to consider. With the help of a professional, landscaping transforms your outdoor living environment. A professional landscaper knows how to create dynamic and sustainable spaces that will enhance your quality of life, increase the value of your home and provide you with great satisfaction for a long time. Before contacting a professional landscaper, we advise you to plan your project by following the following steps.
Step 1: Set your goals
  • Are you interested in developing a single area on your property or do you want to transform several spaces? If the plan concerns several areas, which are the priorities?
  • Apart from the aesthetic aspect, how important is the functionality of the space? Are you aiming for maximum use of the premises?
  • Do you want your new garden to provide more security, more privacy, or greater ease of access?
  • Which style do you prefer: natural, urban, formal, informal, etc.?
  • What elements already exist in the places you want to keep, such as trees, rocks, streams, landscaping, etc.?
  • Is there a view you would like to keep, improve or hide?
  • Do you want to develop a plan or do you already have one? What are your design preferences, such as colours, types of materials, choice of plants, etc.?
  • What are your expectations for maintenance? Do you expect to spend a lot of time there, or do you prefer a low-maintenance layout?
Step 2: Identify the elements you want to be a part of your space
  • Cooking, dining, entertainment and relaxation areas
  • Barbecues, firepits, and outdoor fireplaces and heaters
  • Pools, spas, or other water features, such as waterfalls or ponds
  • Trails and walking areas, and shaded and sunny spaces
  • Garden pavilions, gazebos, pergolas, fences or trellises
  • Patios, terraces, playgrounds and lawn areas
  • Trees, shrubbery and plants, including ground cover, vines, vegetables, etc.
  • Lighting (both aesthetic and functional)
  • Irrigation, rainwater harvesting systems
  • Storage sheds or areas
Step 3: List the factors that could influence your design
  • Location and zone of your property
  • Climate (snow, wind, temperature)
  • Topography of the site (characteristics of the land surface)
  • Areas of sun and shade already present
  • Soil condition (e.g., clay soil, wet, swamp, sand, etc.)
  • Drainage and irrigation
  • Existing landscaping and permanent elements already in place
  • Municipal regulations, such as height restrictions on structures or construction distances to be respected; please check your municipality’s website for more information
  • Underground infrastructure, such as pipes, aqueducts, cables, etc.
  • Any restrictions on the schedule of work; keep in mind that it is best to do most landscaping work between the months of April and November
Step 4: Have a plan drawn up
A professionally designed plan is an essential step in any landscaping project. Since it reflects your choices, a master plan helps you keep control of your project and avoid unpleasant surprises, because it gives you an overview of the final result. To help you visualize how the components of your plan will work with existing property aspects and structures, your plan will identify plant elements (trees, plants, flowers, grass), inert elements (stones, patios, structures), as well as water and lighting features. This overview will be an important reference tool to explore the possibilities available to you, and will allow you to develop the design according to your needs and budget, as well as according to the stages of development. A professional plan will help you achieve your goals and maximize the potential of your property. It can also save you money. Landscaping is often a significant investment – mistakes and misunderstandings can be expensive. A professional can help you avoid making costly mistakes.
Step 5: Look for a Certified Landscaper
Certified landscapers are recognized for their commitment to the highest standards of quality. Take the time to fully research the professional association in your area and find the right landscaper for you.

Source: Association of Professional Landscapers of Quebec (appq.org)

Designing the Perfect Outdoor Kitchen

Designing the Perfect Outdoor Kitchen

Relax, socialize, eat… These daily activities take place largely outside in summer months of the year. Current barbecues have multiple functions and offer different cooking possibilities. With so many different cooking options, we can prepare the entire meal outdoors!

Creating a kitchen area around the grill allows the cook to enjoy family and guests while cooking – making the grill not only a utilitarian appliance, but also a social gathering place. There are a wide range of home kitchen appliances built for outdoor use. Fridge, ice machine, pantry, beer keg… everything you need.

Quality is Key

It’s important to choose quality appliances and products that are designed for outdoor use. Quartz or granite countertops are suitable for an outdoor kitchen, but a protective sealant must be applied every year to preserve the luster of the stone. Concrete also needs to be sealed regularly. Another option is a non-porous material such as neolith, not requiring any yearly maintenance. Appliances and materials of good quality are essential for the sustainability of an outdoor kitchen. Even with protective coverings for the winter months, appliances must be able to withstand extreme temperature ranges, so buying good quality appliances that are suitable for outdoor use is crucial. Specialty retailers generally offer good warranties.

Plan Ahead When Designing

Be sure to always check dimensions and sizing of new appliances in order to integrate them without trouble into the kitchen. Although you may be only installing a few features now, proactively think about what else you would like to add in the future so you have the space to do so. Accounting for counter space is crucial – side burners, sinks, portable appliances and a work area all take up counter space. If the area is small, you may want to stick to a grill, a prep area and a space for the trash. Installing a sink with running water available in your outdoor kitchen is very practical. However, this requires plumbing work and the convenience may not outweigh the costs, depending on the configuration of your outdoor area.

Smart and Stylish Design

Make your outdoor kitchen an extension of your home – both in use, but also in style and design. Be sure to choose colours and styles that flow with the rest of the home and consider tying in different features to match your indoor kitchen, whether it be your cabinet colour, backsplash or countertop. This will harmonize the feel of your home. Also, remember to consider the amount of direct sunlight your outdoor space receives – dark colours can become very hot. You may want to avoid a dark counter if your outdoor kitchen is exposed. It’s important to prioritize what is important for you and your family to make the most of your outdoor living area. Don’t be afraid to start by brainstorming your dream outdoor kitchen and working backwards to ensure you meet your budget.

Winter Grilling

Winter Grilling

Barbecue season doesn’t end when there is snow on the ground. It not only takes us back to our roots as Canadians but can be a nice treat when you’re feeling those winter blues.

Winter grilling works best on two types of barbecues. The first is a gas grill that has a cook box made of double-walled steel or cast aluminum. The other is a ceramic charcoal barbecue. They are great at holding in the heat in cold temperatures.

Infrared barbecues are a growing trend. They can be especially good in winter when propane doesn’t flow well, natural gas doesn’t heat up fast enough, and charcoal is too much work. They use burning gas to heat ceramic burners through thousands of microscopic flame ports. The ceramic burners absorb the heat, then glow and emit infrared energy, which cooks food with the same intense, dry heat that charcoal does. But unlike charcoal, an infrared model heats up fast, doesn’t add ash to your food and distributes its heat with absolute regularity.

10 Tips For Winter Grilling
  • Invest in a grill cover if you don’t already have one. This will keep snow and ice off the barbecue and allow you to get grilling with the least amount of hassle. When possible, make sure your barbecue is shielded from the wind to help it heat up quickly and to maintain the desired cooking temperature. However, you should always keep the barbecue 10 feet away from your house or any flammable structure or overhang.
  • Never barbecue in your garage or any enclosed space. This is a fire hazard, and there is also the risk of carbon monoxide poisoning. Carbon monoxide is a colourless, odourless and tasteless by-product of burning fuel incompletely and can build up quickly in an enclosed area without your knowledge.
  • Take time to put on boots, a coat and a toque. If you’re underdressed, chances are you’re going to rush and be careless. Snow gloves are designed for cold, not heat, and can melt if brought too close to a hot barbecue. Many types of snow parkas are also not meant for exposure to extreme heat or open flames, so be very careful not to get too close and keep sleeves away. Don’t wear anything that could dangle into or over the grill – that means scarves are out.
  • Have lots of fuel. There’s nothing worse than running out of fuel halfway through grilling. In cooler temperatures, you lose heat more quickly and use more fuel to keep your grill hot. Your barbecue may use an extra 20-30% of fuel to help get up to and maintain temperatures.
  • Watch for critters. Some animals will crawl into barbecues in the winter and hole up. Give your grill an inspection before you start.
  • Some electronic igniters do not perform well in cold weather. Keep a barbecue lighter handy just in case. If the control knobs are stiff or difficult to turn, do not force them because it is much easier to break off the knob or damage the valve stem in freezing temperatures. Light only the burners for which you can freely turn the control knobs and preheat the grill with a closed lid until the rest of the control knobs turn freely. If you can’t turn any of the control knobs, position the grill away from the wind in a sunlit area to help them free up.
  • Make sure all your tools are in place before lighting the grill. A grill light, clip-on light or headlamp can be one of the most useful barbecue accessories in winter. It will definitely help to make sure your medium-rare steak doesn’t end up charred beyond recognition. Get your tongs, a bottle of water and you might want to have a fire extinguisher ready. In cool weather grease can pool on the bottom of your grill and catch fire. Be prepared for flare-ups.
  • Preheat the grill at a higher setting than you normally would. Your gas grill will need to be on a higher setting to reach the same cooking temperature under more moderate conditions. Preheat your serving platter as well so when you’re ready to take your food off the grill you can bring out the warm plate and ensure your food doesn’t cool too quickly.
  • Keep the top lid closed as much as possible. Every time the lid is opened heat escapes and the grill has to heat up again, which will ultimately increase cooking time. Invest in a digital thermometer. Bluetooth-enabled thermometers that send the temperature measurements right to a phone or laptop give you the chance to take shelter inside and monitor your meat at the same time. Always keep an eye on the barbecue though because flare ups can still occur in cold weather.
  • To keep in the heat, the best foods for grilling in winter are either foods that grill really quickly or low and slow-cooking foods that require very little attention. This will reduce your need to lift the lid.
Flow Limiting Device

You’re more likely to accidentally activate the Flow Limiting Device (a safety feature that limits the flow of gas in the event of a leak) in cold temperatures.

Here’s how to avoid activating the Flow Limiting Device when grilling in the winter:

  • Slowly open the gas tank no more than half a turn.
  • Wait 30 seconds after opening the gas tank before opening the main control knob and lighting the grill. This will allow time for the gas pressure to equalize, thus reducing the likelihood of triggering the Flow Limiting Device (FLD).
  • If you’ve accidentally activated the FLD, you might experience low heat and/or low flames. If you think you may have accidentally tripped the FLD, read how  to reset it in the manual.
Recipe Ideas For Winter Grilling

Slow Cooking in the Winter
Gently smoked pork butt with a sweet/spicy rub, a classic beer-can chicken, juicy rib-eyes, a roast of pork or beef, or pulled pork or brisket.

Seafood Grilling
Clams and oysters are at their peak in the winter months and can be popped open on a hot, smoky grill. A generous spread of cilantro chili butter and a squeeze of lime is a taste of milder seasons. Dungeness crab is also at its best in winter. If you’re partial to chilled crabs, a quick toss into a handy snowbank after a turn on the grill is a quick and excellent way to cool them down.

Quicker Grill Options
Spatchcocked chicken (this method helps to cook the chicken faster and more evenly), kebobs, pizza, thin pork chops or steak, or butterflied chicken breast.

Be Prepared When the Power Goes Out

Be Prepared When the Power Goes Out

Living in Canada, we’ve all experienced a bad winter storm. Freezing temperatures, piles of snow and, every so often, the power goes out, sometimes for days. Is your home ready for a power outage?

Be Prepared

You want to be sure you can feed your family and heat your home, or at least zones within your home. Be sure to have enough water (2 litres per person, per day) and nonperishable food available for up to 72 hours.

Heating Your Home

Are you prepared for your furnace and stove to be turned off for an extended period of time? Luckily, there are many products available that don’t run on electricity. Gas fireplaces, stoves and inserts are great secondary heat sources, especially when the power is out. Gas hearth appliances are designed to operate during a power failure. Some generate their own electricity or have battery back-up systems. It’s important to know which system you have for circumstances such as this. If your gas appliance has a battery back-up, make sure you have installed new batteries before every heating season.

Wood fireplaces, stoves and inserts are also great alternative heat sources. Be sure to have an adequate supply of fuel on hand. The radiant heat these units produce can warm your living spaces for days when necessary. There are fans available for freestanding woodstoves that help distribute heat through the room and require no electricity. They use the heat of the wood stove to power the fan.

Cooking Without Electricity

Some wood or gas burning stoves can also be used for heating food and water on top of the stove. Some wood and gas models have a second top layer. To improve the heat conductivity on these stoves, place your cook pot directly on the inner top. If your model is equipped with a trivet, remove it to access the inner top and maximize the heat conducted from the stove top. Some cook stoves even include an oven or a water reservoir for cooking and washing. Ovens or Dutch ovens can also be purchased separately to allow for even cooking on a stove. Take care to ensure there is no risk of the pot tipping over. It’s a good idea to purchase a thermometer with these units to maintain the heat more easily while cooking.

Cooking on your wood stove does require some forethought to allow the stove to function properly. Unlike an electric stove top there is no dial to regulate the temperature.  You control the heat by the amount of wood you place in the stove and attention is required to manage the heat properly. For high heat, it’s important to establish a good, large fire. For slow cooking food such as chili, soup or leftovers, the fire should burn low and steady for a long time by adding only one or two pieces of wood at more frequent intervals. You can also let the fire die down to a bed of coals and cook foods in a small Dutch oven or a foil packet directly on the hot bed of coals. Practice cooking on your wood stove before a power outage occurs to give yourself a better idea of how your wood stove will heat and cook foods!

Use Your Barbecue (But Never Inside the Home!)

Another great appliance to use during a power outage is your barbecue. Although this may seem like a surprise to some, many grill owners continue to grill all year long. Although winter grilling takes a bit more time compared to grilling in the summer months, it is still a great way to prepare food – even when the power isn’t out. Check out our article on Winter Grilling.